


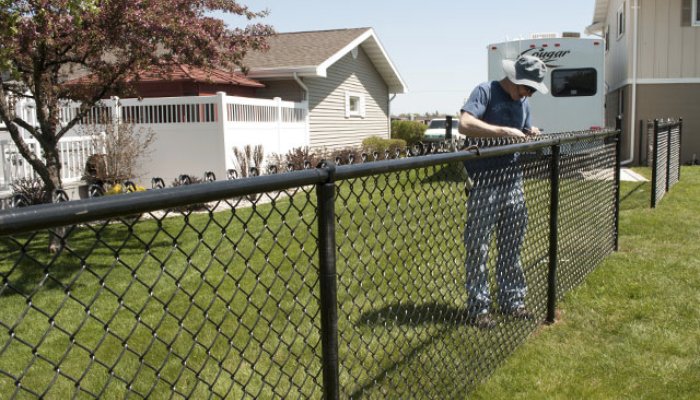
A chain-link fence is a type of fence that is formed of galvanized or steel wire in a zig-zag pattern. Chain-link fencing is sometimes referred to as chain wire fencing, wire mesh fencing, and rhombic mesh fencing. These are available in a variety of materials, sizes, and appearances. In addition to being suitable for household use, they are also suitable for professional use. This sort of fence is also suitable for temporary support and can be used to restrict access to an area for a set length of time.
What All You Will Need
Equipment / Tools
- Come-along tool with stretcher bar
- Ratchet wrench set
- Pliers
- Post hole digger
- Garden hose and water supply
- Trenching shovel
- Bubble post level
Materials
- 1 roll chain link fabric
- 2 terminal posts, each 6-foot
- 1 line post, 6-foot
- 1 top rail, 10-foot, 6 inches
- 2 tension bars
- 6 tension bands
- 1 bag tie wires, 30 count
- 2 terminal post caps
- 1 line post eye top
- 2 rail ends
- Tension wire
- 2 brace bands
- 4 bags of quick-set concrete
- Wood stakes and twine
- Landscape gravel
Steps Involved in Chain Link Fence Installation
1. Start the Preparations
- Consult your local building department to see if a permit is required.
- Determine your property line. Determine the location of your fence in relation to your property line.
- Determine the size of your fence and the type of material you prefer.
2. Collect All Necessary Materials
Part of knowing how to build a chain link fence is knowing what all parts you will need and collecting them.
- Line Post Cap
- Top Rail
- End Post Cap (terminal cap)
- Rail Ends
- Tension Bands
- Tie Wire
- Chain Link Fence Posts
- Tension Wire
- End Post / Corner Post
- Tension Bar
3. Set Up the Face
- Set your fence about four inches away from your property line to prevent property line disputes with your neighbors.
- Lay out the perimeter of the fence using batter boards and mason’s line. Start with this line if you’re running your fence parallel to the home.
- Using the 3-4-5 approach, square the corners. Make a mark on the string line 3 feet from where the lines intersect. Make a mark 4 feet along the line that runs perpendicular to that line. Between the 3 foot and 4 foot markings, take your measurement. Adjust the line so that the marks are 5 feet apart.
- Spray paint fence post placements based on fence panel dimensions. Use a fence post that is no taller than 10 feet.
- Leave an extra 3 3/4 inches between the posts while setting out the chain link fence gates. This will free up some space for the hinges and latch. Specific measurements should be taken as per the manufacturer’s specifications.
4. Create Post Holes
- Make post holes three times the diameter of the post.
- End and corner posts should be 6 to 8 inches deep.
- Line posts should be dug 4 to 6 inches deep.
- Make the holes one-third the length of the pole plus four inches for gravel.
- 4 inches of gravel should be used to fill all of the holes.
- Tamp with a hand tamper or a 4-by-4 foot post.
- Fill the hole with 6 inches of concrete for the end, corner, and gate posts.
- Leave the other slots unfilled.
5. Set Up Posts
- Check that the fresh concrete is not too thin. The batter should have a thick consistency like that of a cake batter. Follow the manufacturer’s directions or buy pre-made cement.
- Level the posts in the wet concrete.
- Ensure that the holes in the corner, gate, and end posts are filled with concrete.
- After every few shovelfuls, examine the posts for plumb and modify as needed.
- Slope the concrete top so that water drains away from the posts.
- Allow the concrete to cure for two to three days, or as directed by the manufacturer.
- Do not use concrete to fill the holes for the line posts, and do not install the line posts.
6. Attach Tension Bands and Gate Hardware
- Each corner, gate, and end post should be secured with tension bands.
- Place the fence gate hooks and latch hardware on the gate posts in their final placements. Hinge height is determined by the dimensions and design of your gate.
- Wrap a brace band around each end and gate post, as well as two around each corner post.
- Drive end post caps onto the gate, corner, and end posts using a rubber mallet.
7. Prepare and Install Caps & Rails
- Using a mallet, drive looped line caps onto the line posts. Place the posts in their respective holes, but do not fill them.
- Bolt a rail cap to each brace band, compressing only enough to secure the cap.
- Ensure that the looped caps are fed with rails.
- Rails can be cut with a pipe cutter or hacksaw if necessary.
- If you require longer rails, connect them together.
- Rails with a significantly smaller jammed end that fits into a full-size rail or a top rail sleeve should be used.
- The ends of all cuts can be deburred with a file if necessary.
- Place the rails in the rail caps.
- Increase or reduce each cap to the final mesh height.
- Allow for a 2-inch space at the bottom.
- Adjust the brace bands to keep the rail height stable.
- Fill in the holes all around line posts with earth and tamp it down until it is hard.
- Keep the posts plumb as you fill-up the hole.
8. Set Up a Tension Bar and Unroll the Fabric of the Fence
- Place the chain link mesh outside the fence on the ground.
- Weave the tension bar through the mesh’s links at the end.
9. Connect Tension Bar to Post
- Raise the mesh.
- Insert the tension bar between the tension bands’ openings.
- To secure the tension bar, thread a bolt into each tension band.
- Lock the tension bar into the tension bands on one of the end posts with a socket wrench.
- Align the mesh so that it overlaps the rail by 1 to 2 inches and sits 2 inches above the ground.
10. Stretch the Fabric of the Fence
- Attach a tension bar about three feet short of the corner or end post where the mesh will be terminated.
- Connect it to the stretcher bar.
- Rotate the cable puller until the mesh loops move no more than 14 inch when squeezed together.
11. Adjust the Fence Fabric
- Pull on the mesh to reshape it if it altered height or became damaged during tightening.
- Through the mesh, weave a tension bar without releasing the fence puller.
- Ensure it is close enough to the tension bands on the fence puller end post.
12. Clear Unnecessary Mesh
- Open a loop at the top and bottom to remove the surplus mesh between the tension bars and end post.
- Twist the strand and pull it free.
13. Tighten the Tension Bands
- Pull the tension bar by hand into the tension bands on the end post.
- Using a socket wrench, tighten the bolts on the bands.
- Disconnect the tension bar and stretcher bar after releasing the fence puller.
- Repeat the hanging and stretching process along the additional fence sides.
14. Attach the Fence Fabric to the Rails
- Make a hook out of one end of an aluminium tie wire.
- Take hold of the bottom strand of the aperture above the railing.
- The tie wire should be wrapped all around the top rail.
- Pull it tight and reattach it to the mesh.
- Tie wires should be spaced every 24 inches along the top rail and attached to the line posts every 12 to 16 inches.
15. Finish Fencing
- Insert a tension wire into the mesh’s bottom loops and wrap it around the end posts.
- Wrap the wire many times around itself to secure it.
- Instead of threading the wire, secure it to the mesh using hog rings every two feet or so.
You’re one step closer to getting a new fence now that you know how to install a chain link fence. Chain link fences can be a cost-effective way to enhance your property, keep pets in, and add security. Premier Site Services provides cheap fence rentals in Vancouver for you in your city.
FAQs
Is the height of line posts and terminal posts the same?
Line posts are typically 2″ lower than terminal posts and 2″ higher than fence mesh. Because the line posts are lower, the top rail + looped cap will be approximately level with the top of the fence mesh.
Is there a recommended distance between chain link fence posts?
Chain link fence posts are usually placed no more than ten feet apart. For aesthetic purposes, space posts evenly, but no more than ten feet apart.
Is it necessary to cement chain link fence posts?
It is possible to build a chain link fence without utilising concrete, although it is not recommended. Concretely anchoring each fence post is the greatest approach to assure that your fence will stand straight and upright for several years.
Is a top rail required on a chain link fence?
Mostly all permanent chain link fences contain a top rail to sustain the chain link fabric’s weight and prevent it from drooping over time.